
Nginx
DNS查询过程
TCP创建
HTTP创建
请求的method
get:获取url资源(看朋友圈)
post:提交,更新或创建资源,是非幂等的(发布朋友圈)
put:向指定url传送更新的资源,是幂等的(更新朋友圈)
delete:向指定url删除资源(删除朋友圈)
head:用于检查 (仅获取header部分的内容)
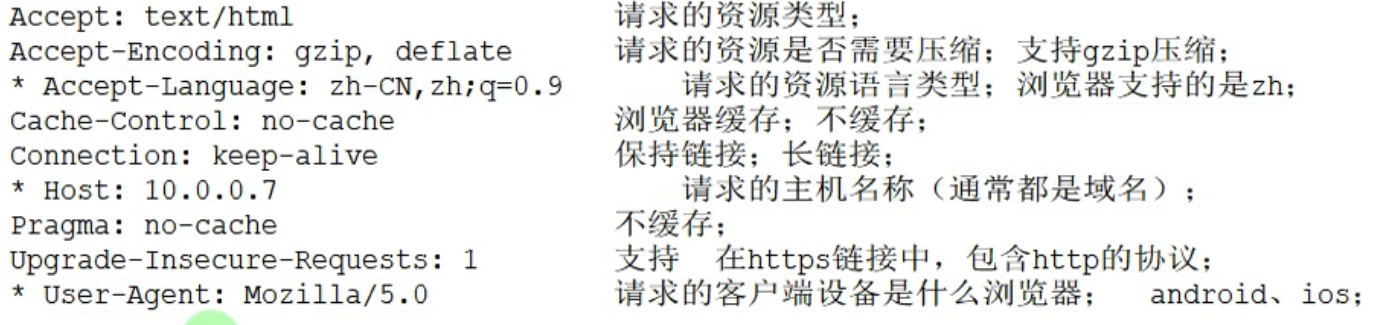
请求的header
http1.0短链接:一次tcp握手,一次请求,断开
http1.1长链接:一次tcp握手,多次请求,断开
(若网页出现加载时间过长,可在F12查看是否有服务在长时间加载或卡住了,再修改对应的服务问题)
HTTP响应
响应的header

响应的状态码
状态码说明
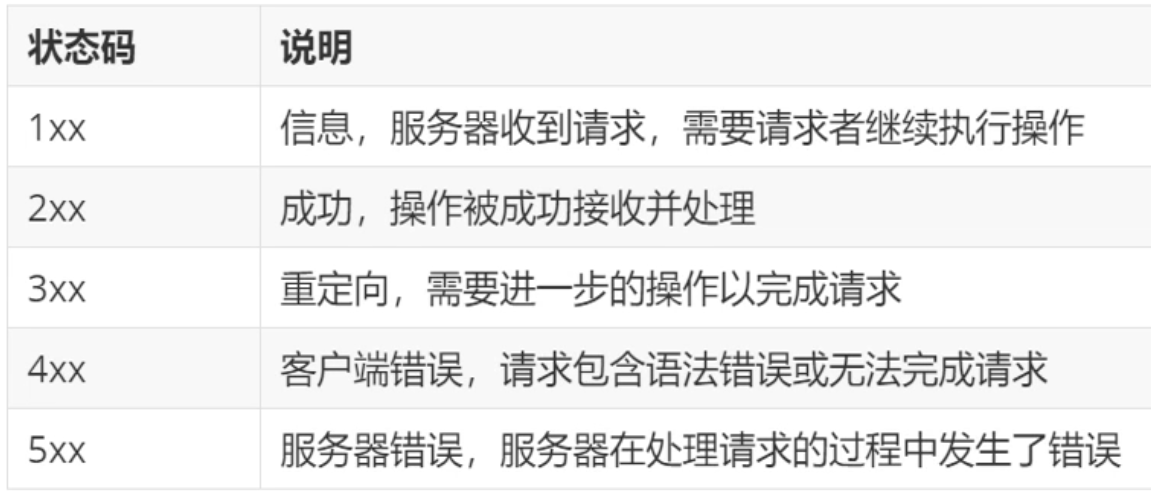
常见状态码
200:表示客户端成功接收到服务端返回的数据
206:客户端发完请求后,服务端只返回了一部分数据,例如下载大文件时,没下载完会出现
301:永久重定向(http-->https)
302:临时重定向
400:客户端请求语法错误,服务端无法理解
401:服务端开启了用户验证,客户端没有提供正确的验证信息
403:服务端不允许客户端访问页面(客户端权限不足),或没找到默认返回页面(所有web服务器默认的返回页面都是index.html,需要在服务端修改或添加默认返回页面)
404:客户端请求的资源不存在(请求路径错误或服务端不存在这个资源)
413:客户端向服务端发送了一个大文件,且文件的大小超过了服务端的限制(例如1MB)
500:服务端出现了内部错误,需要人为排查(链接数据库类服务异常时会出现)
502:服务器充当代理角色时,后端代理的服务器不可用或没有正常回应
503:服务当前不可用,通常是服务器停用或超载导致服务器无法处理客户端请求
504:服务器充当带角色时,后端服务没有按时返回数据,超时了(例如代理向后端申请要70s,但设定了后端60s没有回应就显示超时,此时需要调整超时时限)
TCP断开
nginx网络IO模型
用户请求 Nginx 这样的 web服务器获取磁盘中的文件时,系统是如何处理的?
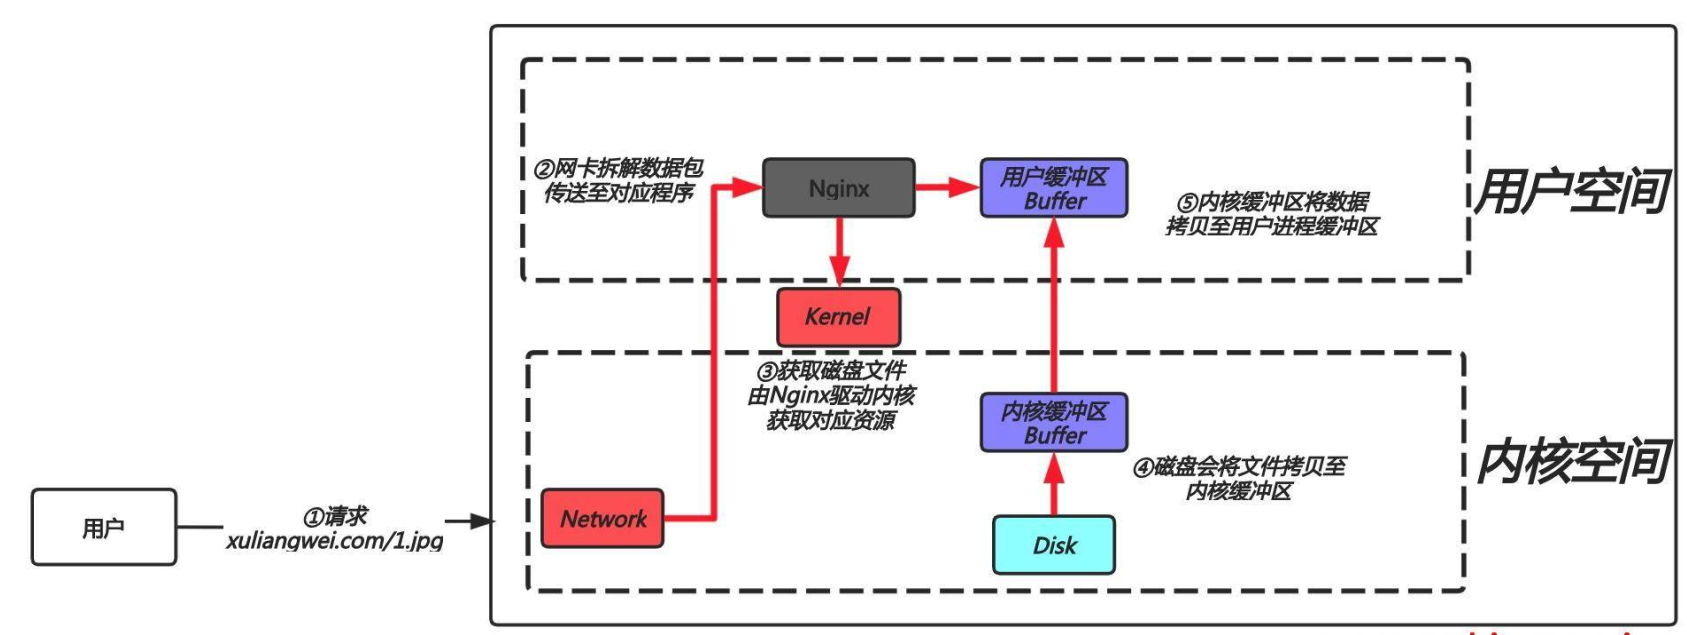
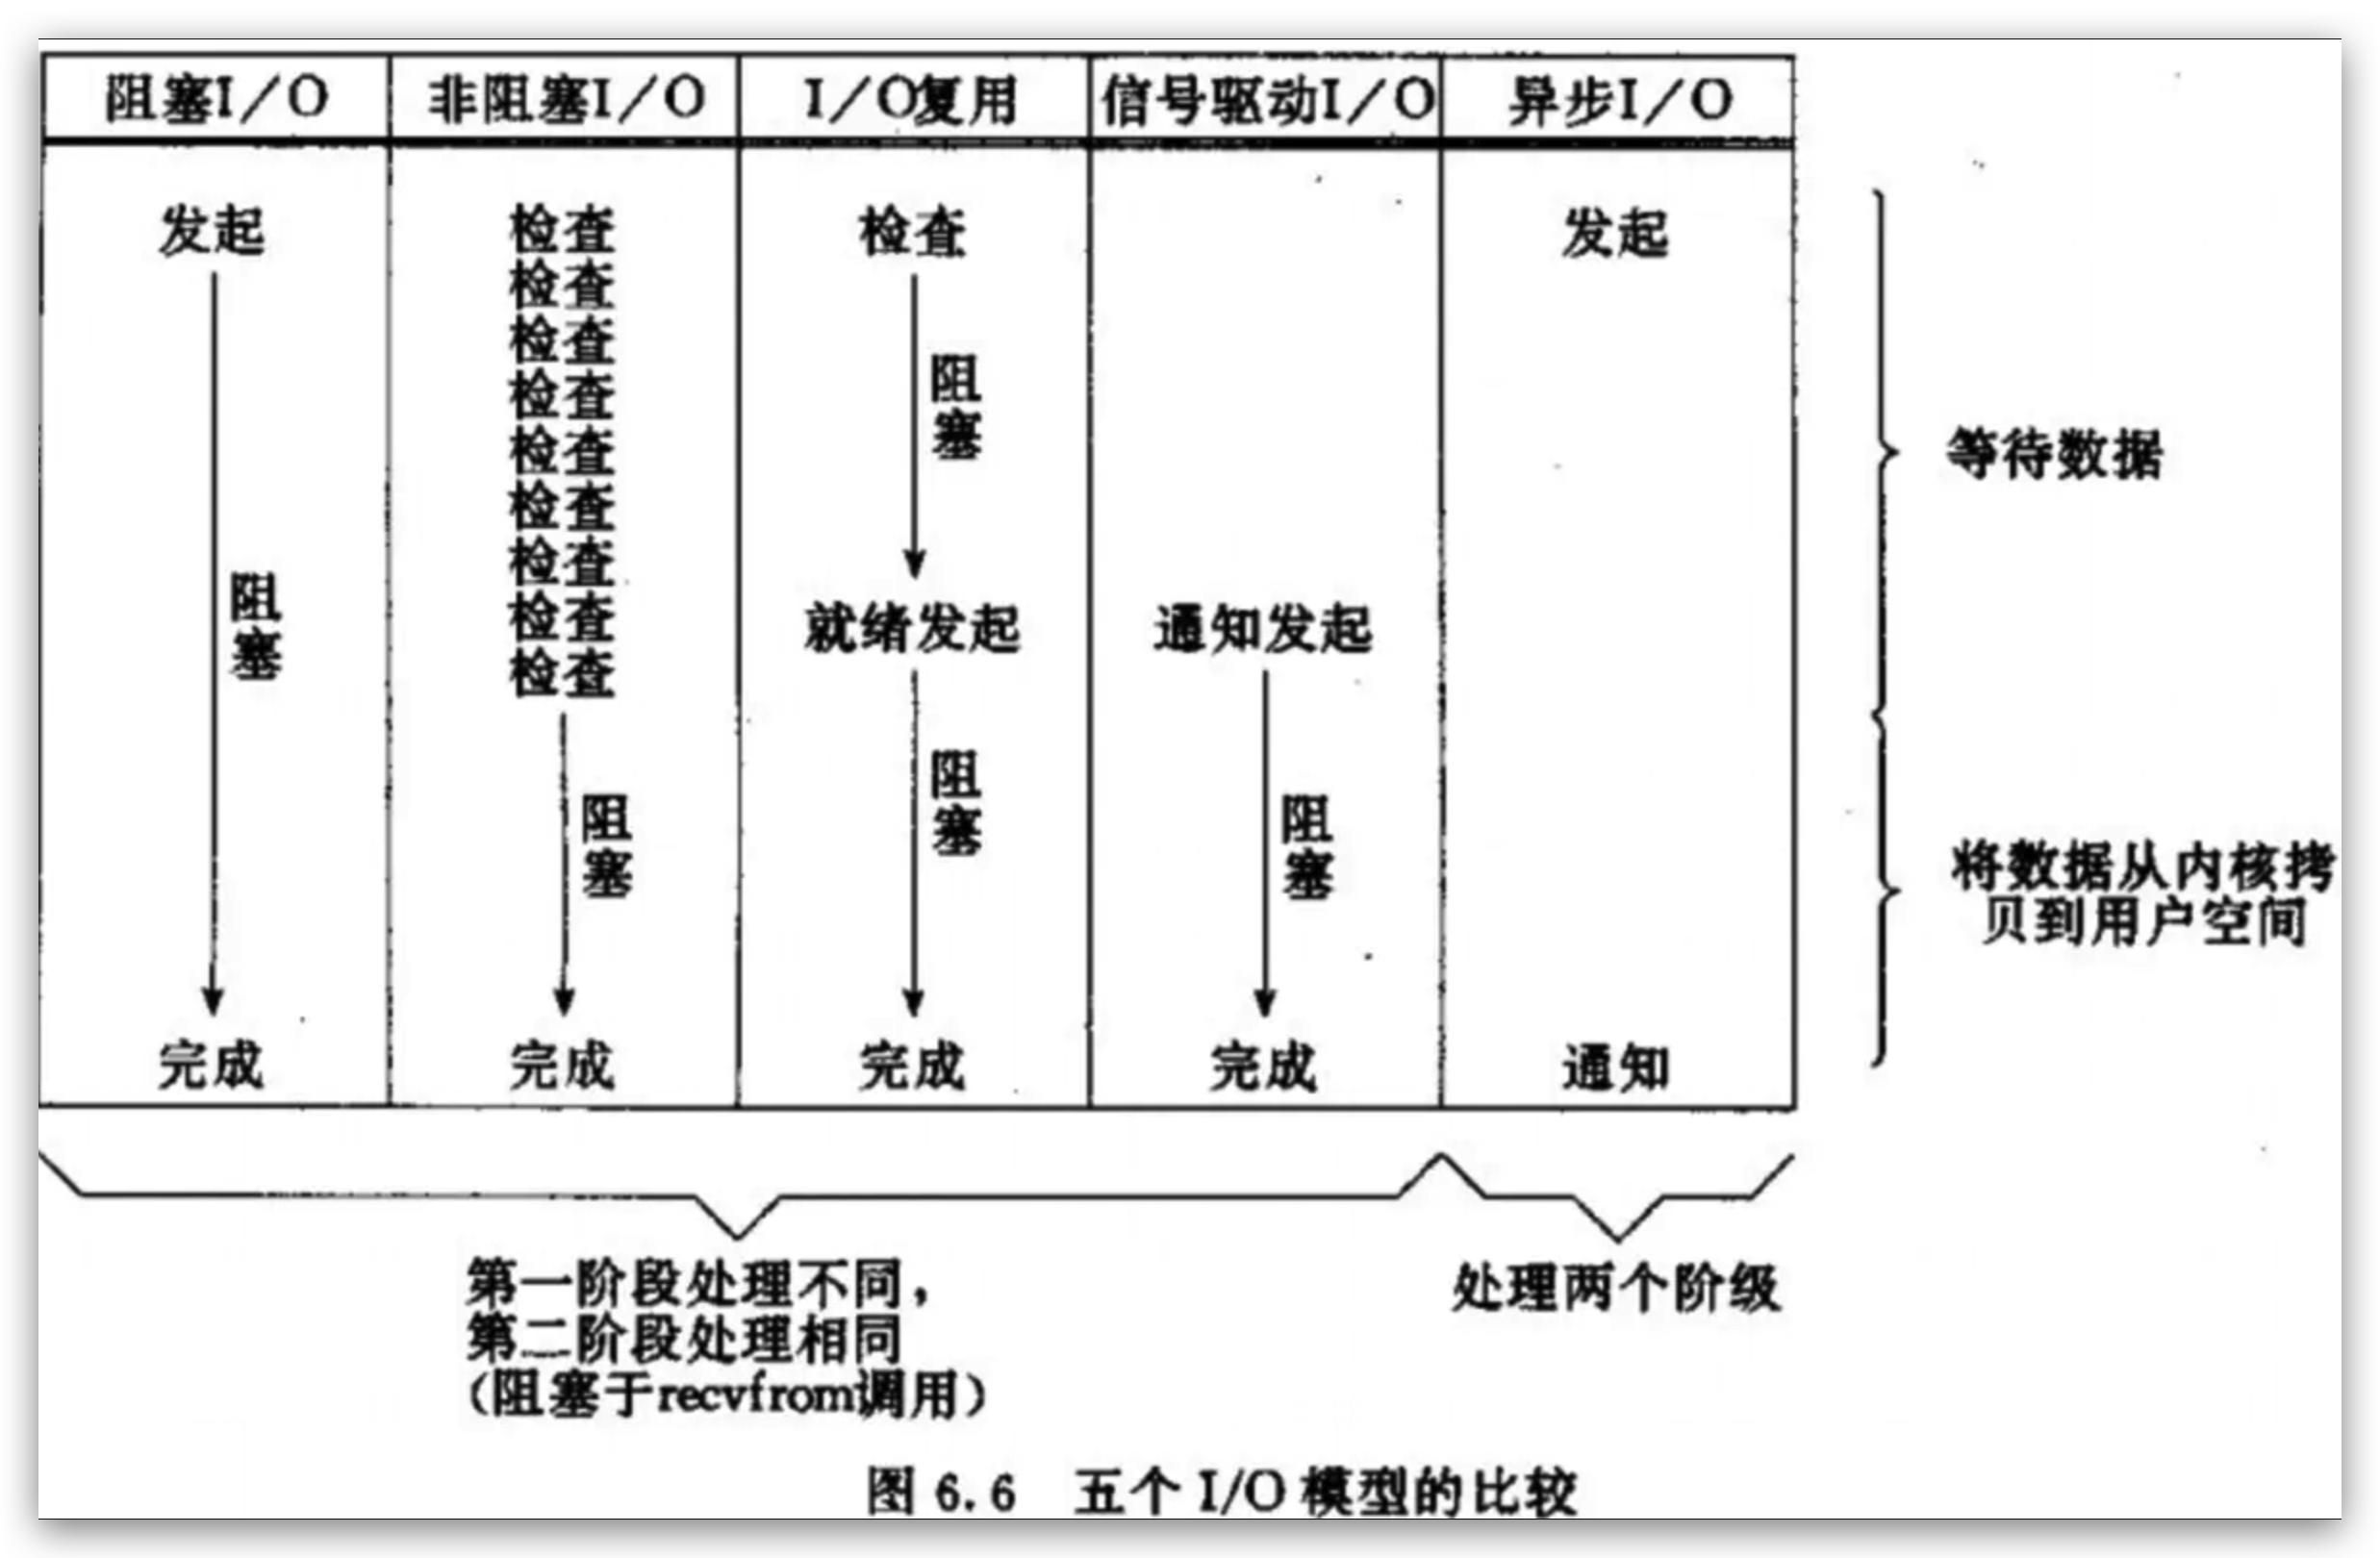
用户每一次请求都会发生一次IO操作:而每次IO,都要经由两个阶段:
第一步:将数据从磁盘加载至内核的内存空间(缓存区),等待数据准备完成,时间较长。
第二步:将数据从内核缓冲区复制到用户空间的进程内存(缓存区),时间较短。
第三步:Nginx封装数据为响应报文发送。
1.nginx下发指令给内核后,nginx是等待,还是不等待继续处理新的请求;
2.数据拷贝到内核缓存中了,通知nginx应用程序,阻塞
同步/异步
关注消息通知机制
同步:
调用者发送指令给被调用者,被调用者需要获取资源后返回给调用者,同步指调用者需要主动去询问被调用者当前的运行状态
异步:
调用者发送指令给被调用者,被调用者需要获取资源后返回给调用者,异步指被调用者会主动给调用者返回当前的运行状态
阻塞/非阻塞
阻塞:
IO操作需要完成后才能返回用户空间,调用结果返回前,调用者挂起
非阻塞:
IO操作发起后立刻给用户进程返回状态值,无需等待IO操作完成,在最终结果返回前调用者不会被挂起
IO组合模型
同步阻塞:
调用者需要主动查询运行状态,且IO操作完成前不能处理别的请求(不主动返回状态且挂起)
同步非阻塞:
调用者需要主动查询运行状态,但IO操作完成前可以先去处理别的请求(不主动返回状态不挂起)
异步阻塞:
被调用者会主动返回运行状态,但IO操作完成前不能处理别的请求(主动返回状态且挂起)
异步非阻塞:
被调用者会主动返回运行状态,且IO操作完成前可以先去处理别的请求(主动返回状态不挂起)
IO模型对比
IO模型实现
select:对应IO复用模型
poll:对应IO复用模型
Epoll:对应IO复用模型,具有信号驱动IO的某些特性
NginxWeb
nginx组成部分
1、nginx二进制可执行文件,是nginx本身框架以及相关模块构建的二进制文件,所有功能由他提供
2、nginx.conf,他能决定开启哪些功能或开启后定义怎样的行为去处理请求
3、access.log,会记录nginx处理的每一条http的请求信息,响应信息
4、error.log,出现不可预期的问题时,可通过error.log去定位问题
Nginx安装
安装依赖
yum install -y gcc gcc-c++ autoconf pcre pcre-devel make automake httpd-tools
创建一个文件
/etc/yum.repos.d/nginx.repo
#稳定版
[nginx-stable]
name=nginx stable repo
baseurl=http://nginx.org/packages/centos/$releasever/$basearch/
gpgcheck=1
enabled=1
gpgkey=https://nginx.org/keys/nginx_signing.key
module_hotfixes=true

#开发/最新版
[nginx-mainline]
name=nginx mainline repo
baseurl=http://nginx.org/packages/mainline/centos/$releasever/$basearch/
gpgcheck=1
enabled=0
gpgkey=https://nginx.org/keys/nginx_signing.key
module_hotfixes=true
压缩epel源防止冲突
gzip /etc/yum.repos.d/epel.repo
生成缓存
makecache
安装nginx
yuminstall nginx
还原epel.repo
gzip -d /etc/yum.repos.d/epel.repo
附加:如果有其它服务冲突,则停止服务
systemctl stop httpd
systemctl disable httpd
启动且开机自启nginx
sysytemctl start nginx
systemctl start nginx
检查服务端口
netstat -lntp
Nginx目录结构
[root@web01 ~]# rpm -ql nginx
/etc/logrotate.d/nginx
/etc/nginx -->安装位置
/etc/nginx/conf.d
/etc/nginx/conf.d/default.conf -->提供的默认站点
/etc/nginx/fastcgi_params -->nginx通过模块链接php程序时需要传递的一些变量
/etc/nginx/mime.types -->支持的类型
/etc/nginx/modules -->模块
/etc/nginx/nginx.conf -->主配置文件
/etc/nginx/scgi_params
/etc/nginx/uwsgi_params -->nginx通过模块链接python程序时需要传递的一些变量
/usr/lib/systemd/system/nginx-debug.service
/usr/lib/systemd/system/nginx.service -->服务的启动与停止文件
/usr/lib64/nginx -->nginx二进制文件
/usr/lib64/nginx/modules
/usr/libexec/initscripts/legacy-actions/nginx
/usr/libexec/initscripts/legacy-actions/nginx/check-reload
/usr/libexec/initscripts/legacy-actions/nginx/upgrade
/usr/sbin/nginx
/usr/sbin/nginx-debug
/usr/share/doc/nginx-1.26.1
/usr/share/doc/nginx-1.26.1/COPYRIGHT
/usr/share/man/man8/nginx.8.gz
/usr/share/nginx
/usr/share/nginx/html
/usr/share/nginx/html/50x.html
/usr/share/nginx/html/index.html
/var/cache/nginx -->nginx缓存目录
/var/log/nginx -->nginx日志目录
Nginx配置文件
纯文本类型,以区块形式组织,每个区块用一对大括号{ }表示开始和结束
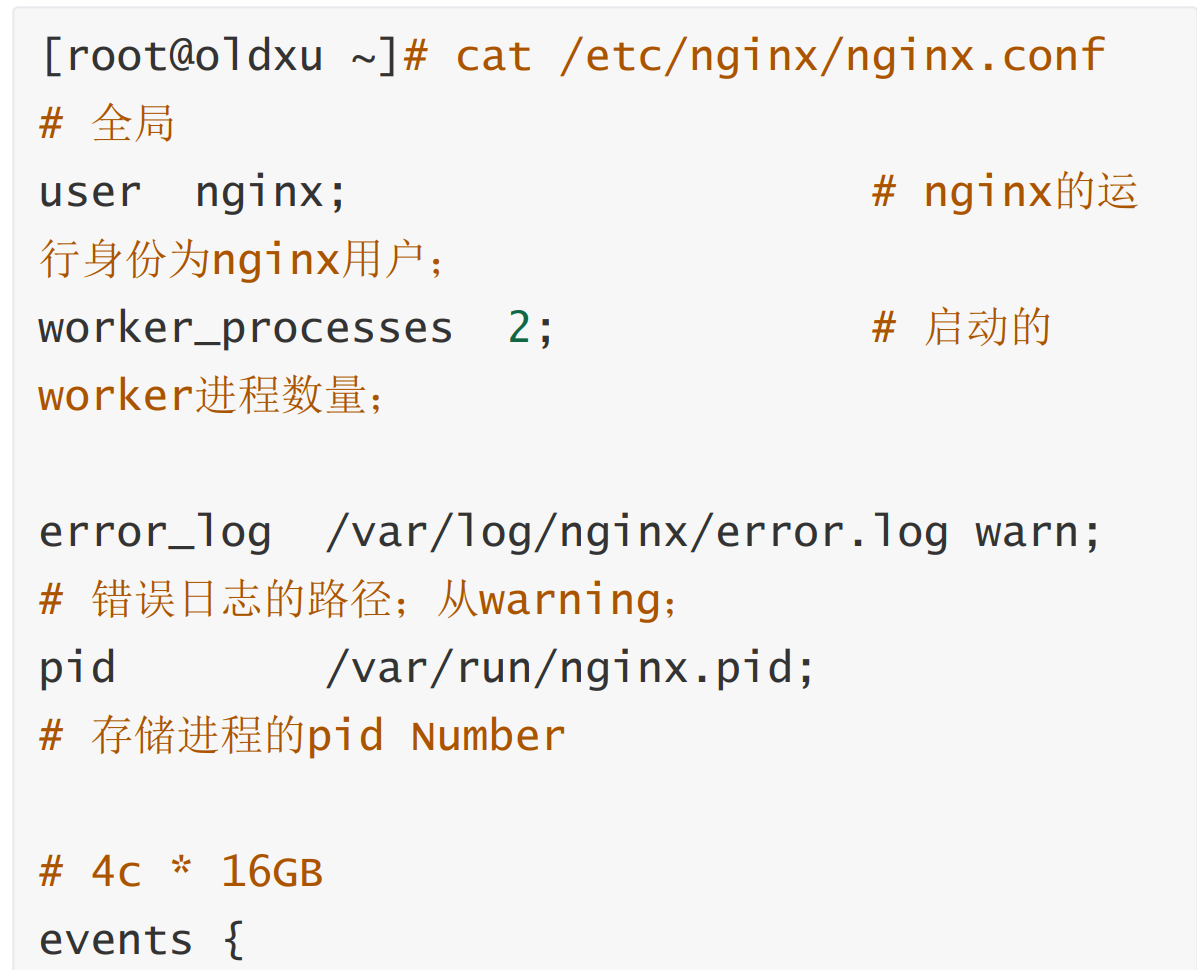

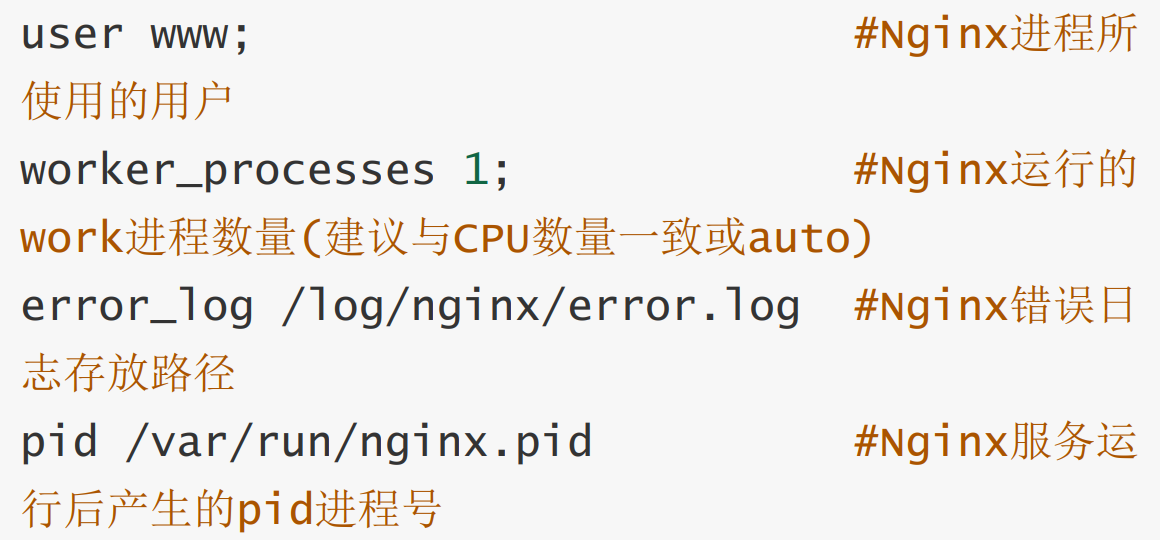
Global全局模块
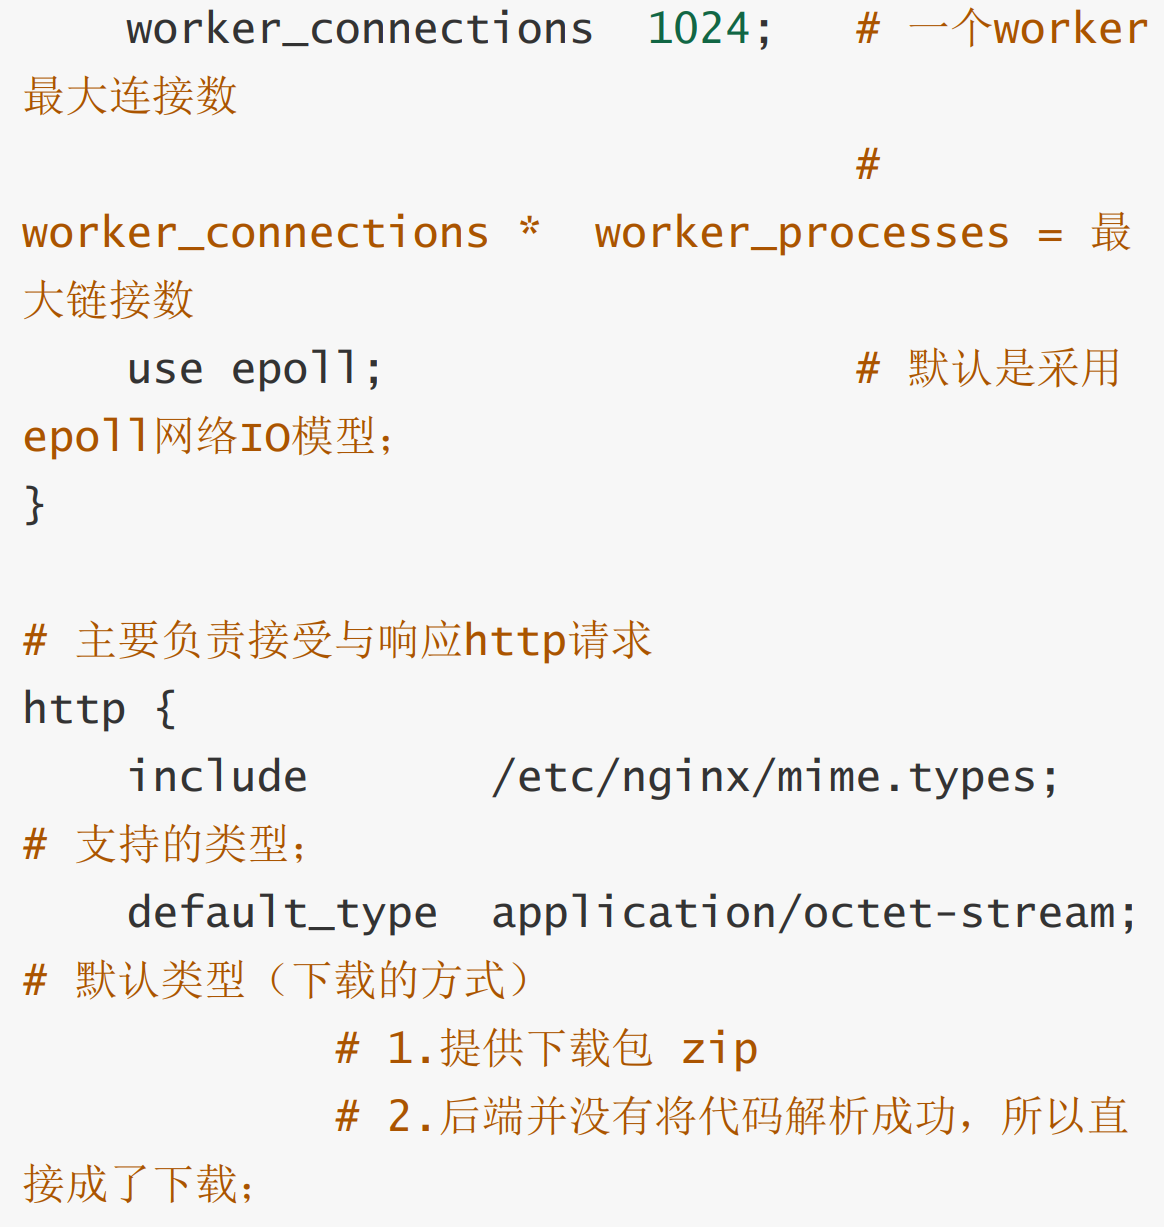
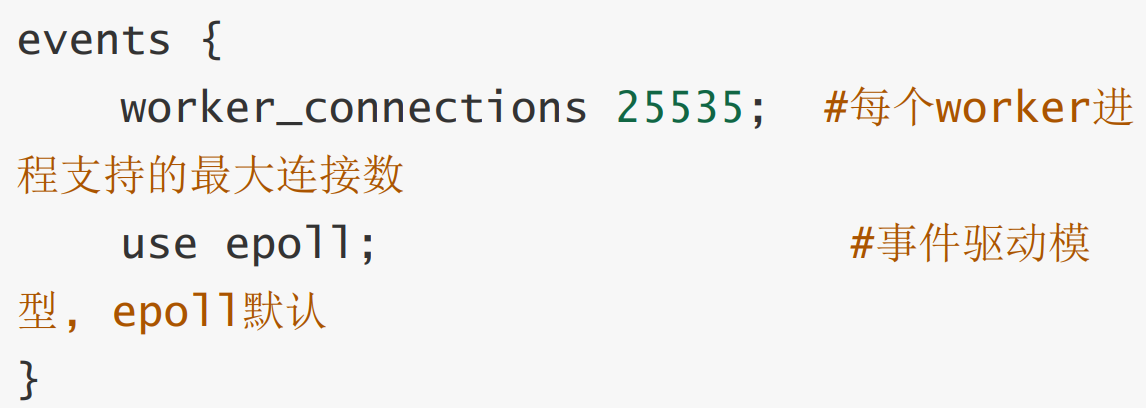
Events事件模块
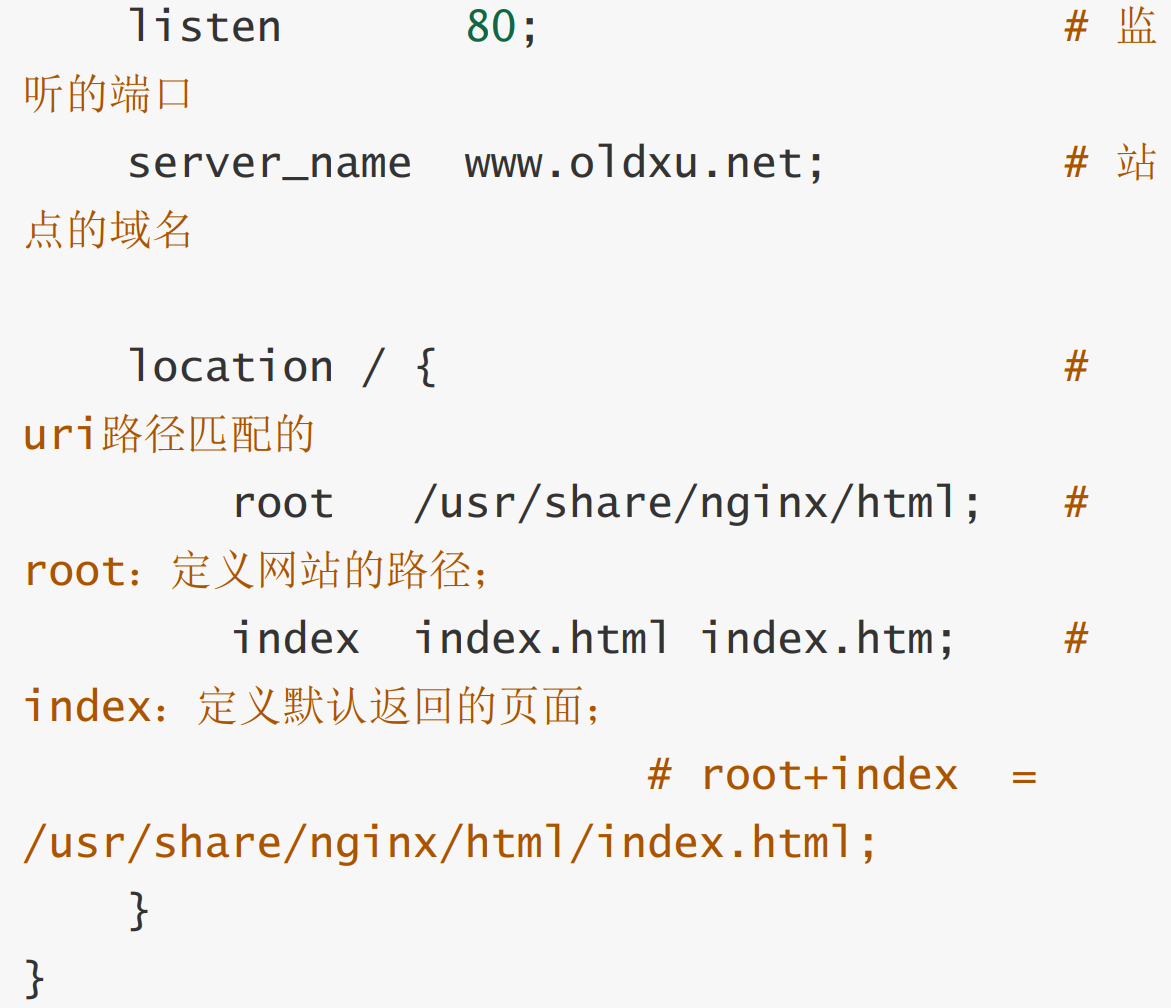
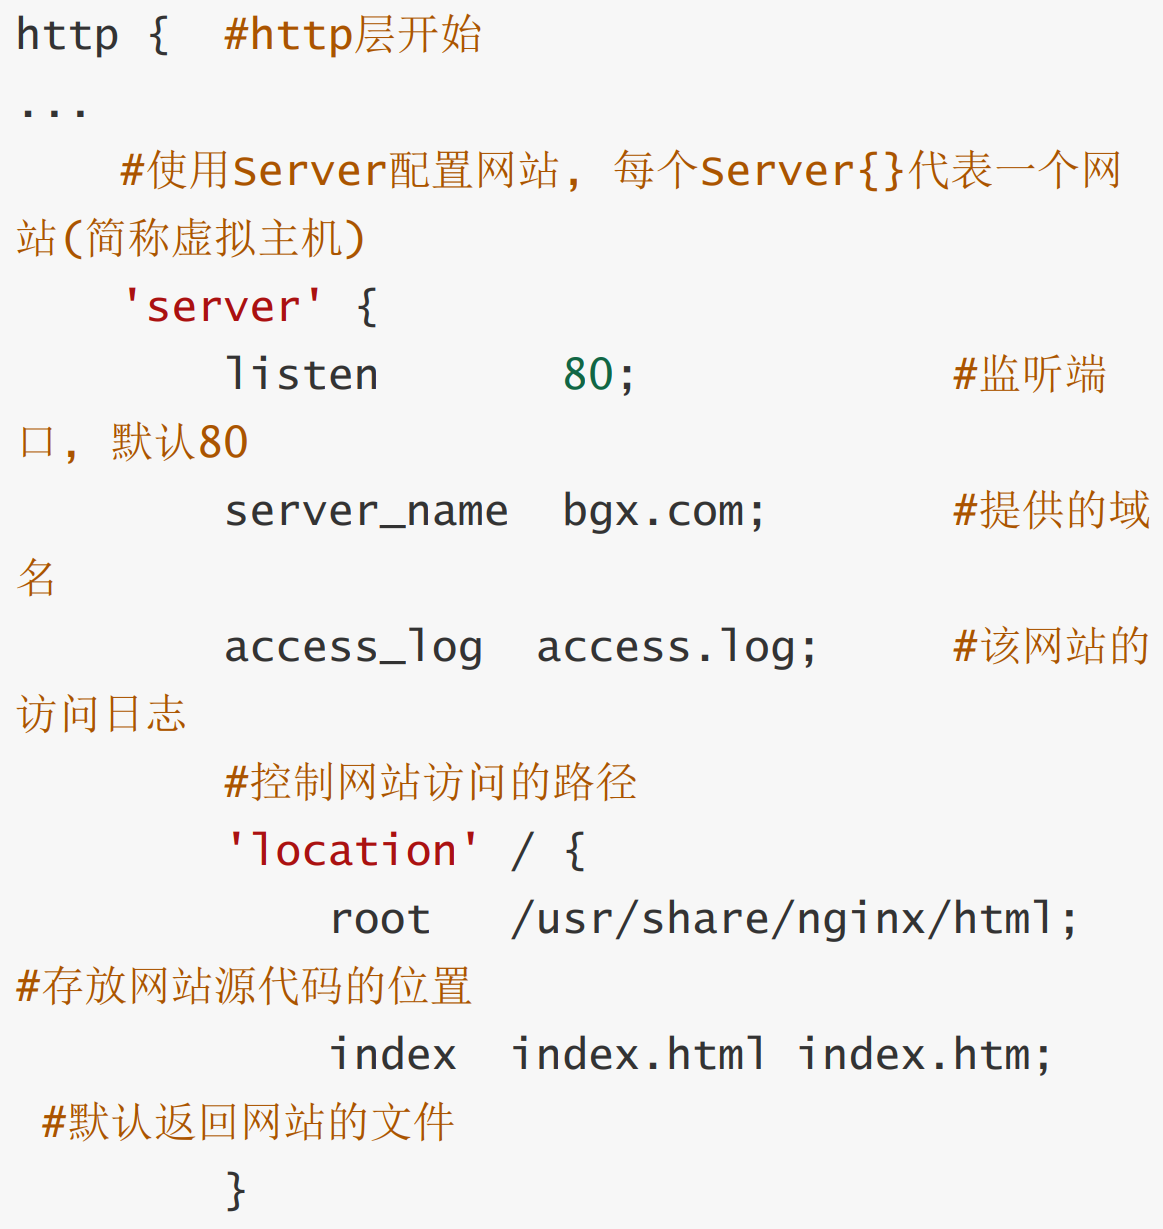
HTTP核心模块
核心模块总结
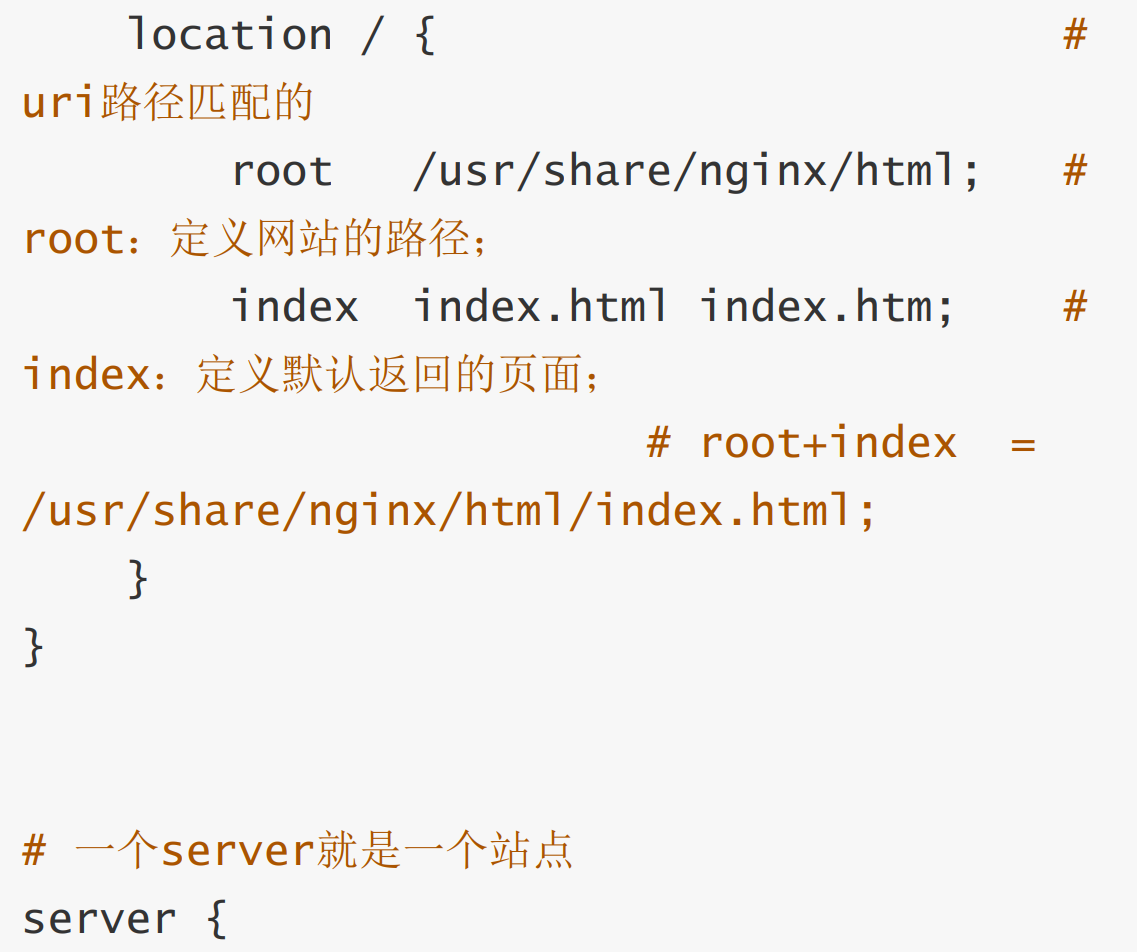
Nginx中的 http、server、location 之间的关系 :
1、http标签用来解决用户的请求与响应
2、server标签用来响应某个具体的网站
3、location标签用来匹配网站具体url路径
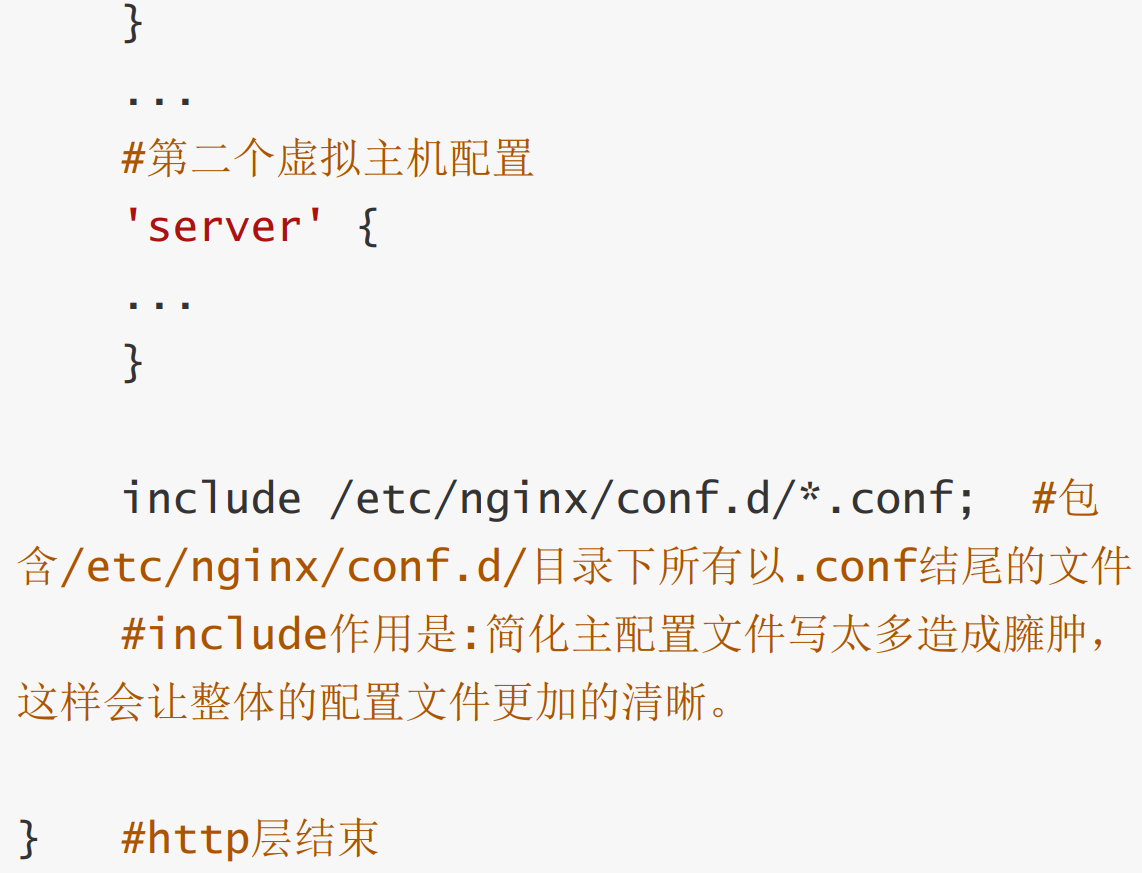
http{ }下可以有多个server{ },一个server{ }下允许有多个location{ }
搭建游戏站点(要求必须用域名访问)
1、编写nginx配置文件
vim /etc/nginx/conf.d/game.zjh.net.conf
server {
listen 80; #监听80端口
server_name game.zjh.net; #使用的域名
location / {
root /code #访问域名后去根下的code下找代码
index index.html; #默认返回的页面
} #此处配置命令需要code下有index.html,否则找不到,无法运行
}
2、准备对应的网站代码
根据配置文件创建/code
unzip tetris-master.zip -d /code/
3、检查nginx配置语法
nginx -t
systemctl reload nginx.service
4、通过浏览器输入域名访问
将game.zjh.net解析到10.0.0.7上,修改C:\Windows\System32\drivers\etc\hosts文件即可(需要以管理员身份运行记事本打开)
默认服务
server {
listen 80 default_server;
#默认显示这个站点
server_name wx.zjh.net;
location / {
root /code1;
index index.html;
}
}
不推荐的方法:不允许通过ip访问页面(会返回自定义的错误代码)
把不需要的nginx默认界面压缩
gzip /etc/nginx/conf.d/default.conf
配置一个新的默认文件
vim /etc/nginx/conf.d/localhost.conf
server {
	listen 80 default_server;
	return 504;
}
推荐方法:通过ip访问时强制跳转到某个页面
server {
	listen 80 default_server;
	return 301 https://jd.com;
}
Nginx虚拟主机
在一台服务器上运行多个网站
实现方式
1、基于多ip实现
eth0:old page
eth1:new page
2、基于多端口实现
a:8080
b:8081
实例(将服务绑定在8081端口上):
server {
listen 8081;
location / {
root /server/port1;
index index.html;
}
}
mkdir -p /server/port1
echo "8081 port web site" > /server/port1/index.html
3、基于相同的端口,但使用不同的server_name来区分,实现在一台服务器上运行多个站点
Nginx配置文件-autoindex设置
server {
        listen 80;
        server_name mirrors.zjh.net;
        charset utf8,gbk;      (设置可以显示中文字体)

        location / {
                root /repo;
                index index.html;

                autoindex on;      (如果指定目录下没有index,则自动生成客户端请求的目录里的文件列表)
                autoindex_exact_size off;   (关闭精准显示字节大小,on则是显示所有字节大小)
                autoindex_localtime on;     (开启后文件显示的生成时间为本地时间)
        }

}
设置通过域名访问时展示index页面,域名后添加(例:data)时才展示资源列表
优化前:
server {
        listen 80;
        server_name mirrors.zjh.net;
        charset utf8,gbk;

        location / {   (只通过域名访问会展示自定义的页面)
                root /repo;
                index index.html;

        }

        location /data {    (在域名后加/data才能访问资源列表)
                root /repo;    #此时请求的是/repo/data
                autoindex on;
                autoindex_exact_size off;
                autoindex_localtime on;
        }
}
优化后:
server {
        listen 80;
        server_name mirrors.zjh.net;
        charset utf8,gbk;
        root /repo;           (相同的定义可以放在server中表示全局变量)

        location / {
                index index.html;

        }

        location /data {
                autoindex on;
                autoindex_exact_size off;
                autoindex_localtime on;
        }
}
模拟企业内网仓库
[root@oldxu mirror]# cat
/etc/nginx/conf.d/mirror.oldxu.net.conf
server {
listen 80;
server_name mirror.oldxu.net; charset utf-8;
root /mirror;
location / {
index index.html;
}
\#提供yum仓库目录
location /repo {
autoindex on;
autoindex_exact_size off;
autoindex_localtime on;
}
}
#使用rsync同步
[root@oldxu mirror]# rsync -avz rsync://rsync.mirrors.ustc.edu.cn/repo/cent os/ /mirror/repo/
# 将该目录创建为仓库目录
createrepo /mirror/rep
访问控制模块(控制某个页面只能由特定ip访问)
server {
        listen 80;
        server_name mirrors.zjh.net;
        charset utf8,gbk;
        root /repo;

        location / {
                index index.html;

        }

        location /data {
                autoindex on;
                autoindex_exact_size off;
                autoindex_localtime on;

                allow 10.0.0.1/32;   (只允许某个主机ip可以访问/data)
                deny all;			 (其他全部拒绝)
        }
}
基础认证模块
安装服务
yum install httpd-tools -y
创建用户与密码
htpasswd -c -b /etc/nginx/ngx_passwd zjh 1
配置文件
vim /etc/nginx/conf.d/mirrors.zjh.net.conf
server {
        listen 80;
        server_name mirrors.zjh.net;
        charset utf8,gbk;
        root /repo;

        location / {
                index index.html;

        }

        location /data {
                autoindex on;
                autoindex_exact_size off;
                autoindex_localtime on;

                allow 10.0.0.1/32;
                deny all;

                auth_basic "ciallo~";
                auth_basic_user_file /etc/nginx/ngx_passwd;
        }
}
Nginx限速限流
#请求限制的定义(定义限制请求来源的ip,并生成一个10m的空间来存放访问的频次信息,限制每秒处理一个请求)
limit_req_zone $binary_remote_addr zone=req_one:10m rate=1r/s;

server {
        listen 80;
        server_name mirrors.zjh.net;
        charset utf8,gbk;
        root /repo;


#第一个参数:zone=req_one 设置使用哪个配置区域来做限制,与上面limit_req_zone 里的name对应

#第二个参数:burst=3,设置一个大小为3的缓冲区,当有大量请求过来时,超过了访问频次限制的请求可以先放到这个缓冲区内

#第三个参数:nodelay,超过访问频次并且缓冲区也满了的时候,则会返回503,如果没有设置,则所有请求会等待排队

limit_req zone=req_one burst=5 nodelay;
limit_req_status 500;    (可自定义超出访问限制时返回什么状态码)
        location / {
                index index.html;

        }

        location /data {
                autoindex on;
                autoindex_exact_size off;
                autoindex_localtime on;

                allow 10.0.0.1/32;
                deny all;

                auth_basic "ciallo~";
                auth_basic_user_file /etc/nginx/ngx_passwd;
        }
}
Nginx连接限制
limit_req_zone \$binary_remote_addr zone=req_one:10m rate=1r/s;

#连接限制的定义(基于ip地址限制同时下载的资源个数)

limit_conn_zone $binary_remote_addr zone=conn_od:10m;

server {
        listen 80;
        server_name mirrors.zjh.net;
        charset utf8,gbk;
        root /repo;

limit_req zone=req_one burst=5 nodelay;
limit_req_status 500;
limit_conn conn_od 2; (引用连接限制定义,一次只能同时下载两个资源)
limit_rate 200k;
        location / {
                index index.html;

        }

        location /data {
                autoindex on;
                autoindex_exact_size off;
                autoindex_localtime on;

               allow 10.0.0.1/32;
               deny all;

               auth_basic "ciallo~";
               auth_basic_user_file /etc/nginx/ngx_passwd;
        }
}
Nginx限制下载速度
limit_req_zone \$binary_remote_addr zone=req_one:10m rate=1r/s;
limit_conn_zone $binary_remote_addr zone=conn_od:10m;
server {
listen 80;
server_name mirrors.zjh.net;
charset utf8,gbk;
root /repo;
limit_req zone=req_one burst=5 nodelay;
limit_req_status 500;
limit_conn conn_od 2;
limit_rate 200k; -->(限制下载速度为200k)
limit_rate_after 200m; -->(当下载到200m时开启下载限速)
location / {
index index.html;
}
location /data {
autoindex on;
autoindex_exact_size off;
autoindex_localtime on;
allow 10.0.0.1/32;
deny all;
auth_basic "ciallo~";
auth_basic_user_file /etc/nginx/ngx_passwd;
}
}
Nginx状态监控
limit_req_zone \$binary_remote_addr zone=req_one:10m rate=1r/s;
limit_conn_zone $binary_remote_addr zone=conn_od:10m;
server {
listen 80;
server_name mirrors.zjh.net;
charset utf8,gbk;
root /repo;
limit_req zone=req_one burst=5 nodelay;
limit_req_status 500;
limit_conn conn_od 2;
limit_rate 200k;
limit_rate_after 200m;
location / {
index index.html;
}
location /data {
autoindex on;
autoindex_exact_size off;
autoindex_localtime on;
allow 10.0.0.1/32;
deny all;
auth_basic "ciallo~";
auth_basic_user_file /etc/nginx/ngx_passwd;
}
#添加一个状态监控页面
location /ngx_status {
stub_status;(开启状态监控模块)
allow 127.0.0.1;(允许本机地址查看页面)
allow 10.0.0.1/32;(允许windows本机查看页面)
deny all;
}
}
Active connections(当前活跃的连接数,包括waiting等待连接数)
server()
accepts(已接收的tcp总连接数)
handled(已处理的tcp总连接数)
requests(当前总http请求数)
Reading(当前读取的请求头数量)
Writing(当前响应的请求头数量)
Waiting(当前等待请求的空闲客户端连接数)

提取当前网页状态的数值
#curl网页提权信息并筛选活跃连接数
curl -HHost:mirrors.zjh.net http://127.0.0.1/ngx_status | awk 'NR==1{print $NF}'
#curl网页提取信息并筛选失败的tcp连接数(已接收-已处理等于失败连接数)
curl -HHost:mirrors.zjh.net http://127.0.0.1/ngx_status | awk 'NR==3{print $1-$2}'
Nginx资源压缩
图片压缩:
limit_req_zone \$binary_remote_addr zone=req_one:10m rate=1r/s;
limit_conn_zone $binary_remote_addr zone=conn_od:10m;
server {
listen 80;
server_name mirrors.zjh.net;
charset utf8,gbk;
root /repo;
limit_req zone=req_one burst=5 nodelay;
limit_req_status 500;
limit_conn conn_od 2;
limit_rate 200k;
limit_rate_after 200m;
location / {
index index.html;
}
location /data {
autoindex on;
autoindex_exact_size off;
autoindex_localtime on;
allow 10.0.0.1/32;
deny all;
auth_basic "ciallo~";
auth_basic_user_file /etc/nginx/ngx_passwd;
}
location /ngx_status {
stub_status;
allow 127.0.0.1;
allow 10.0.0.1/32;
deny all;
}
#(添加图片压缩的模块)
location ~ /.(jgp|png|jpeg) { (匹配jpg,png,jpeg后缀)
gzip on; (开启图片压缩模块)
gzip_http_version 1.1; (gzip压缩版本号)
gzip_comp_level 2; (压缩等级,级别为1-9)
gzip_min_length 10k; (图片小于10k不压缩)
gzip_types image/jpeg image/gif image/png image/svg+xml image/tiff image/webp; (压缩哪些格式的图片,类型可添加)
gzip_vary on; (添加 Vary: Accept-Encoding)
}
}
文件压缩:
limit_req_zone \$binary_remote_addr zone=req_one:10m rate=1r/s;
limit_conn_zone $binary_remote_addr zone=conn_od:10m;
server {
listen 80;
server_name mirrors.zjh.net;
charset utf8,gbk;
root /repo;
limit_req zone=req_one burst=5 nodelay;
limit_req_status 500;
limit_conn conn_od 2;
limit_rate 200k;
limit_rate_after 200m;
location / {
index index.html;
}
location /data {
autoindex on;
autoindex_exact_size off;
autoindex_localtime on;
allow 10.0.0.1/32;
deny all;
auth_basic "ciallo~";
auth_basic_user_file /etc/nginx/ngx_passwd;
}
location /ngx_status {
stub_status;
allow 127.0.0.1;
allow 10.0.0.1/32;
deny all;
}
#(添加图片压缩的模块)
location ~ /.(jgp|png|jpeg) { (匹配jpg,png,jpeg后缀)
gzip on; (开启压缩模块)
gzip_http_version 1.1; (gzip压缩版本号)
gzip_comp_level 2; (压缩等级,级别为1-9)
gzip_min_length 10k; (图片小于10k不压缩)
gzip_types image/jpeg image/gif image/png image/svg+xml image/tiff image/webp; (压缩哪些格式的图片,类型可添加)
gzip_vary on; (添加 Vary: Accept-Encoding)
}
#(文件压缩)
location ~ \.(txt|pdf)$ { (匹配txt,pdf后缀)
gzip on;
gzip_http_version 1.1;
gzip_comp_level 2;
gzip_min_length 1k;
gzip_types text/plain application/pdf; (压缩哪些格式的文件)
gzip_vary on;
}
}
Location(控制访问网站的uri路径)
location = (精确匹配,优先级最高)
location ^~ (以某个字符串开头,优先级为2)
location ~ (区分大小写的正则匹配,优先级为3)
location ~* (不区分大小写的正则匹配,优先级为4)
location / (通用匹配,任何请求都会匹配到,优先级为5)
实例:
server {
listen 80;
server_name location2.oldxu.net;
\# 通用匹配,任何请求都会匹配到
location / {
root html;
index index.html;
}
\# 精准匹配,必须请求的uri是/nginx_status
location = /nginx_status {
stub_status;
}
\# 严格区分大小写,匹配以.php结尾的都走这个location info.php
location ~ \.php$ {
default_type text/html; return 200 'php访问成功';
}
\# 严格区分大小写,匹配以.jsp结尾的都走这个location
location ~ \.jsp$ {
default_type text/html;
return 200 'jsp访问成功';
}
\# 不区分大小写匹配,只要用户访 问.jpg,gif,png,js,css 都走这条location
location ~* \.(jpg|gif|png|js|css)$ {
return 403;
expires 3d;
}
\# 不区分大小写匹配
location ~* \. (sql|bak|tgz|tar.gz|.git)$ {
deny all;
}
}
Location @重定向
server {
listen 80;
server_name location3.oldxu.net; root /code;
location / {
index index.html;
}
\#如果出现异常,则重新定向到@error_404这个 location上
error_page 404 @error_404;
location @error_404 {
default_type text/html;
return 302 http://location3.oldxu.net; (若出现异常则跳转回主页)
}
}
Nginx日志模块
$remote_addr:获取客户端的ip地址,中间经过代理则获取代理服务器的ip地址
$http_x_forwarded_for:获取客户端真实的ip地址
$http_referer:获取用户来源页面的url,记录用户是从哪个页面跳转到当前页面的
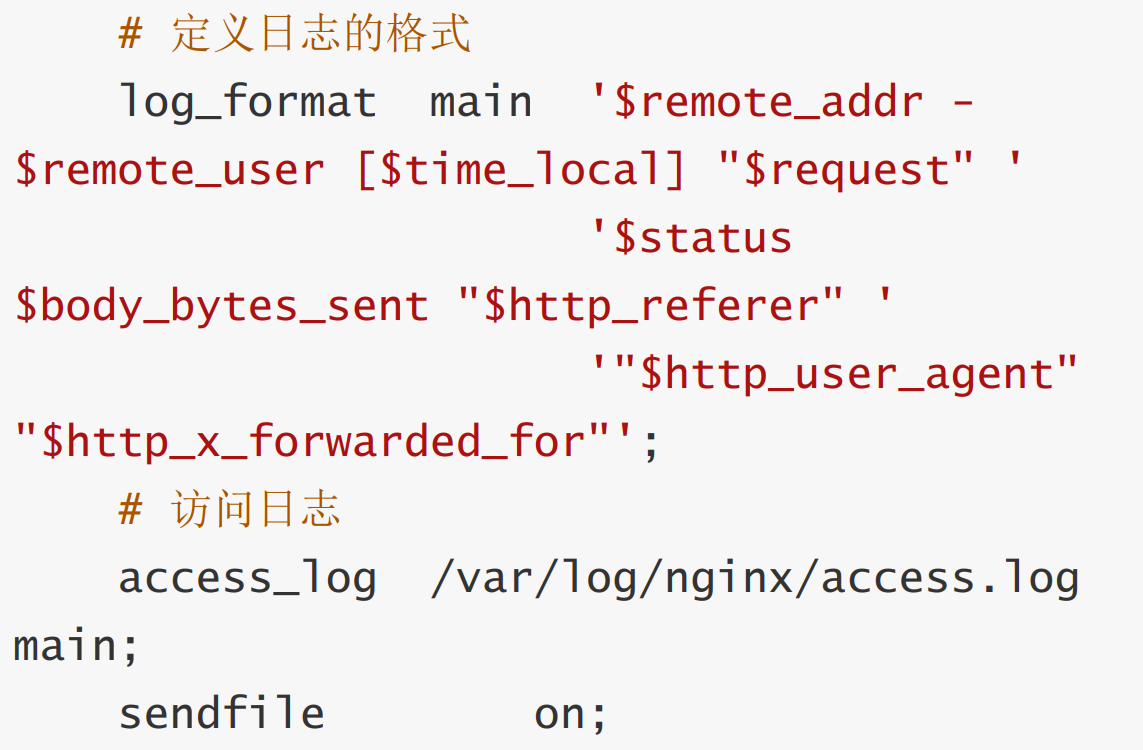
默认Nginx日志语法
vim /etc/nginx/nginx.conf
access_log /var/log/nginx/access.log main;
log_format main '\$remote_addr -\$remote_user [\$time_local] "$request" '

'\$status\$body_bytes_sent "$http_referer" '

'"\$http_user_agent" "$http_x_forwarded_for" ';
vim /etc/nginx/nginx.conf
access_log /var/log/nginx/access_test.log test

log_format test '\$remote_addr -\$remote_user [\$time_local] "$request" '

'$status';
Nginx access日志
最好给每个不同域名的server层定义access日志,做日志隔离
server {
        listen 80;
        server_name game.zjh.net;
        access_log /var/log/nginx/game.zjh.net.log main;

        location / {
                root /code;
                index index.html;
        }
}
Nginx error日志
一般定义在全局,级别有debug | info | notice | warn | error | crit | alert | emerg,默认级别为warn
error_log /var/log/nginx/game.zjh.net.log warn;
关闭错误日志
error_log /dev/null;
Nginx日志过滤
#请求favicon.ico时,不记录日志
location /favicon.ico {
access_log off;
return 200;
}
或
#当有人访问gif,png等静态资源时,将日志丢进黑洞
location ~* .*\\.(gif|png|jpg|css|js)$

{

access_log /dev/null;

}