Nginx-动静分离
将动态请求与静态请求分开处理
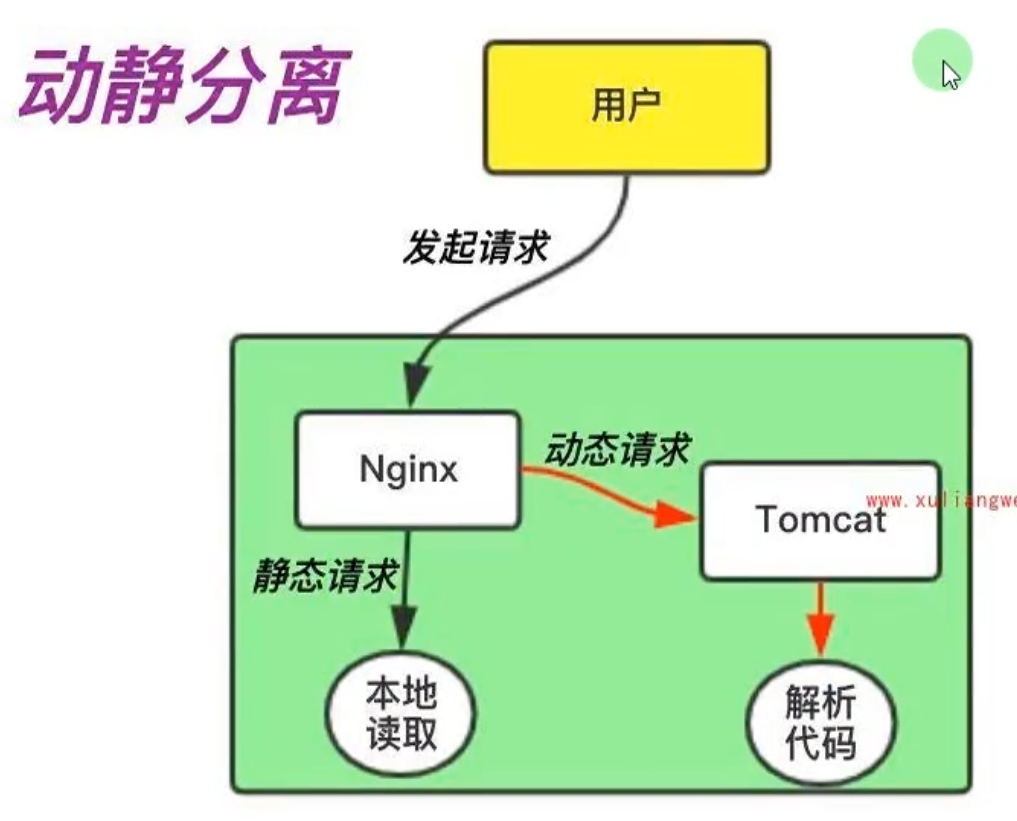
单机动静分离
tomcat配置:
[root@web01 ~]# yum install java -y
[root@web01 ~]# wget https://dlcdn.apache.org/tomcat/tomcat-9/v9.0.104/bin/apache-tomcat-9.0.104.tar.gz
[root@web01 ~]# mkdir /soft
[root@web01 ~]# tar -xf apache-tomcat-9.0.104.tar.gz -C /soft/
[root@web01 ~]# ln -s /soft/apache-tomcat-9.0.104/ /soft/tomcat
[root@web01 ~]# ./soft/tomcat/bin/startup.sh
Using CATALINA_BASE: /soft/tomcat
Using CATALINA_HOME: /soft/tomcat
Using CATALINA_TMPDIR: /soft/tomcat/temp
Using JRE_HOME: /usr
Using CLASSPATH: /soft/tomcat/bin/bootstrap.jar:/soft/tomcat/bin/tomcat-juli.jar
Using CATALINA_OPTS:
Tomcat started.
[root@web01 ~]# netstat -lntp (检查8080端口是否有开启并运行java)
通过网站访问tomcat(10.0.0.7:8080)
nginx配置:
[root@web01 ~]# vim /etc/nginx/conf.d/java.zjh.net.conf
server {
        listen 80;
        server_name java.zjh.net;

        location / {
                proxy_pass http://127.0.0.1:8080;
                proxy_set_header Host $http_host;
        }
}
[root@web01 ~]# nginx -t
[root@web01 ~]# systemctl reload nginx.service
创建静态资源目录并把网站的静态资源移至目录中
[root@web01 ~]# mkdir /code/images
[root@web01 ~]# mv /soft/tomcat/webapps/ROOT/*.png /code/images/
[root@web01 ~]# mv /soft/tomcat/webapps/ROOT/*.svg /code/images/
将网站匹配静态资源的路径调整到自定义的静态资源目录中
[root@web01 ~]# vim /etc/nginx/conf.d/java.zjh.net.conf
server {
	listen 80;
	server_name java.zjh.net;

	location / {
		proxy_pass http://127.0.0.1:8080;
		proxy_set_header Host $http_host;
	}
	location ~* \.(png|jpg|svg|jpeg)$ {
		root /code/images;
		expires 1d;   (将资源缓存一天)
	}
}
[root@web01 ~]# chown -R www.www /code/images/
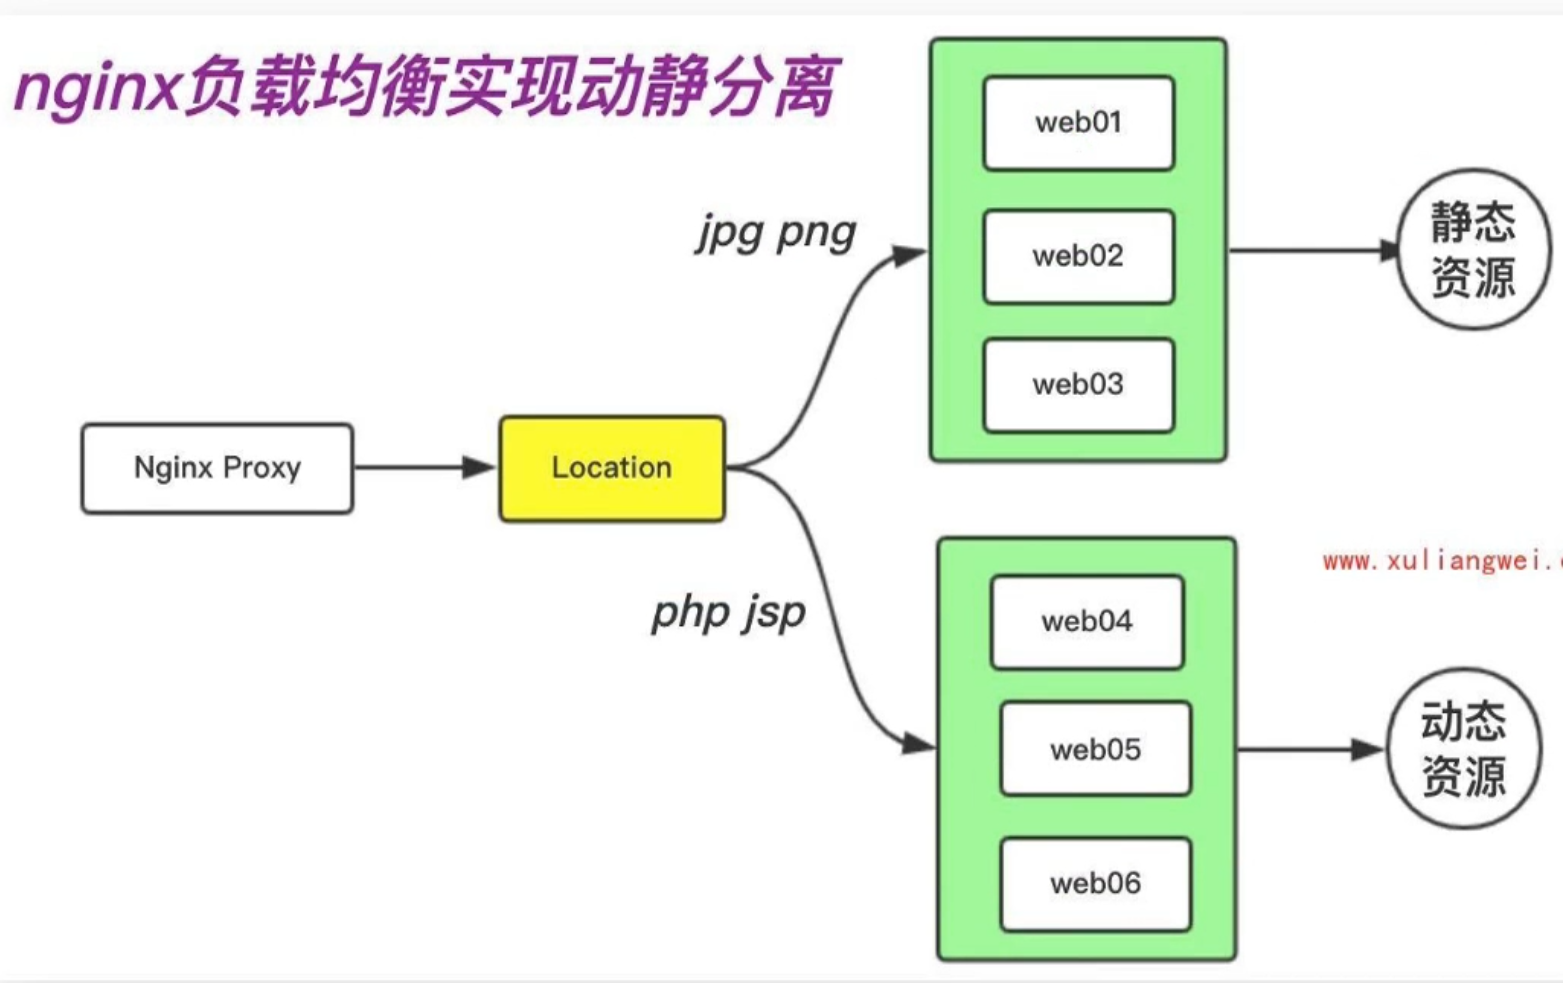
集群动静分离
通过nginx负载均衡分离静态请求与动态请求,基于用户请求用户uri实现路由功能
配置动态节点
[root@web01 ~]# /soft/tomcat/bin/shutdown.sh
[root@web01 ~]# rm -rf /soft/tomcat/webapps/ROOT/*
编写java配置
[root@web01 ~]# vim /soft/tomcat/webapps/ROOT/index.jsp
<%@ page language="java"
import="java.util.*" pageEncoding="utf-8"%>
\<html>

\<head>
\<title>Nginx+Tomcat动静分离\</title>
\</head>

\<body>
<%
Random rand = new Random();
out.println("\<h2>动态资源\</h2>");
out.println(rand.nextInt(99)+100);
%>
%\<h2>静态图片\</h2>
%\<img src="nginx.png" />
%\</body>
%\</html>

<%@ page language="java" import="java.util.*" pageEncoding="utf-8"%>
\<html>

  \<head>
    \<title>Nginx+Tomcat动静分离\</title>
  \</head>

  \<body>
        <%
                Random rand = new Random();
                out.println("\<h2>动态资源\</h2>");
                out.println(rand.nextInt(99)+100);
        %>

        <h2>静态图片</h2>
                <img src="nginx.png" />
          </body>
        </html>
[root@web01 ~]# /soft/tomcat/bin/startup.sh
配置静态节点
准备存放静态资源的服务器:
[root@web02 ~]# vim /etc/nginx/conf.d/ds.zjh.net.conf
server {
	listen 80;
	server_name ds.zjh.net;
	root /code/images;

	location / {
		index index.html;
	}
}
[root@web02 ~]# mkdir /code/images
准备一张命名为nginx.png的图片放进images中访问测试
[root@web02 ~]# wget -O /code/images/nginx.png ![]()
配置负载均衡
[root@proxy01 ~]# cat /etc/nginx/conf.d/proxy_ds.zjh.net.conf
upstream java {
	server 172.16.1.7:8080;
}
upstream static {
	server 172.16.1.8:8080;
}
server {
	listen 80;
	server_name ds.zjh.net;

	location / {
		proxy_pass http://java;
		include proxy_params;
	}

	location ~* .*\.(png|jpg|jpeg|svg|gif)$ {
		proxy_pass http://static;
		include proxy_params;
	}
}
Uwsgi代理
wsgi:为python语言定义的web服务器和web应用程序之间的简单通用接口
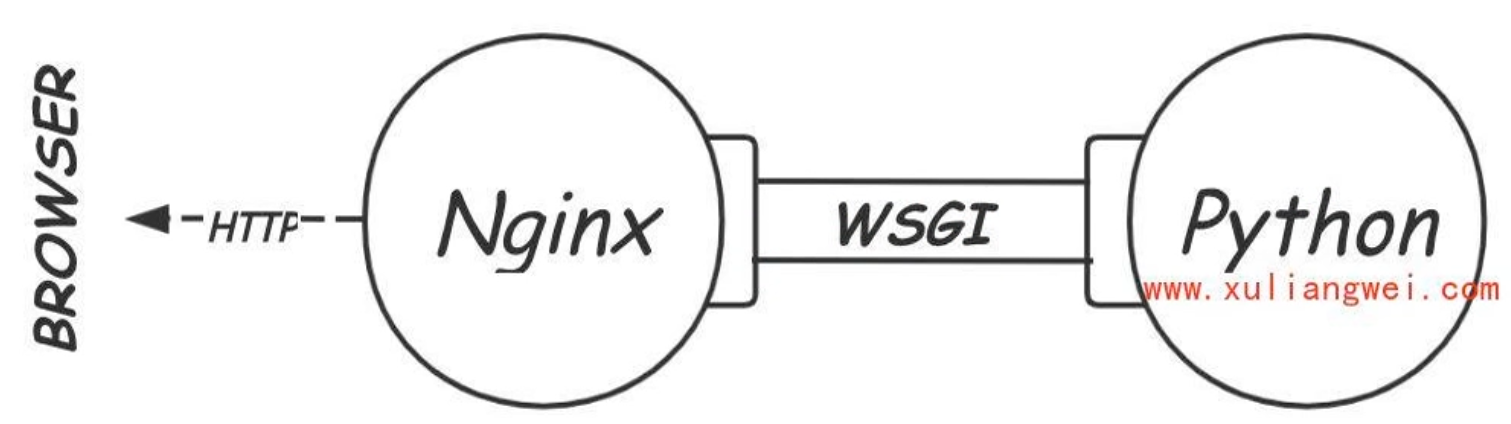
uwsgi:实现了wsgi、http等数据交换协议,项目通过uwsgi方式运行,即可直接对外提供服务,无需依赖nginx
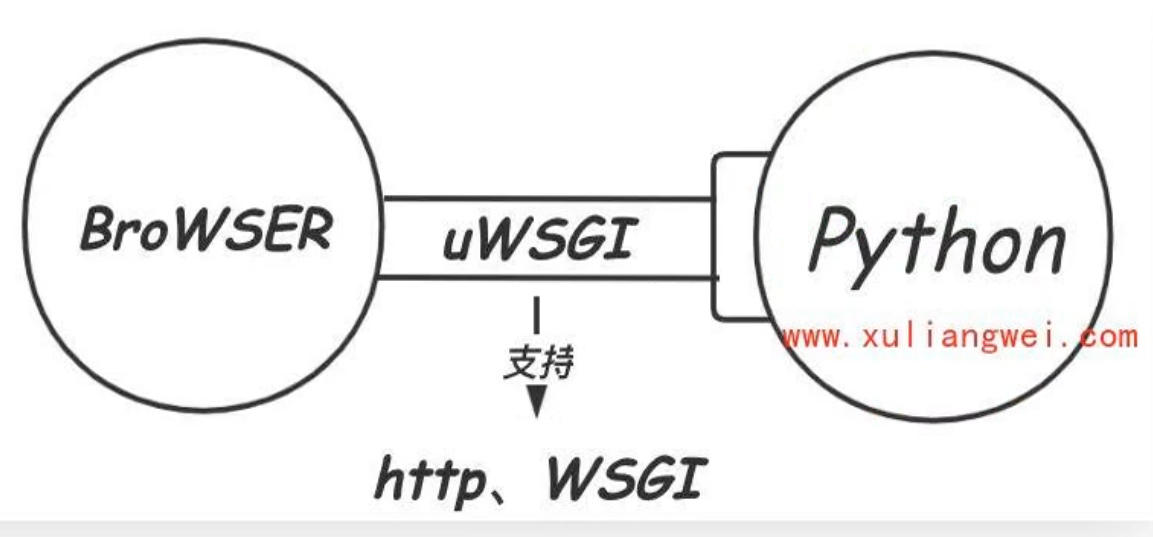
uwsgi结合nginx
· 通常情况下Python中的Django框架或Flask框架可以通过Uwsgi方式对外提供服务。为什么还需要Nginx
· 1.安全:后端服务直接以http对外提供访问,往往会暴露后端的真实服务,如果使用nginx可以隐藏后端的服务,并且nginx能够实现安全限制、Rewrite、HTTPS等功能(这些都是uwsgi无法实现的。)
· 2.效率:nginx可以直接处理静态资源,然后将动态内容通过uWsgi协议转发给后端Django,实现动静分离,提供更好的请求与响应。
uwsgi代理配置
1、安装python3环境
yum install openssl-devel bzip2-devel expat-devel gdbm-devel readline-devel \ sqlite-devel gcc gcc-c++ openssl-devel zlib zlib-devel python3 python3-devel -y
2、安装Django框架以及uwsgi
[root@web01 ~]# pip3 install -i https://mirrors.aliyun.com/pypi/simple/ --upgrade pip
[root@web01 ~]# pip3 install -i https://mirrors.aliyun.com/pypi/simple/ django==2.1.8
[root@web01 ~]# pip3 install -i https://mirrors.aliyun.com/pypi/simple/ uwsgi
3、配置Django工程
[root@web01 ~]# cd /opt/
[root@web01 opt]# django-admin.py startproject demosite
[root@web01 demosite]cd demosite/
[root@web01 demosite]python3 manage.py runserver 0.0.0.0:8002
[root@web01 demosite]# vim demosite/settings.py
搜索ALLOWED_HOSTS
# SECURITY WARNING: don't run with debug turned on in production!
DEBUG = True
ALLOWED_HOSTS = ['*']
4、配置uwsgi
[root@web01 ~]# vim /opt/demosite/uwsgi.ini
[uwsgi]
#uwsgi监听的端口
socket = 127.0.0.1:9999
#uwsgi启动进程数
workers = 2
#最大接收的请求数
max-requests = 1000
#buffer缓冲区大小
buffer-size = 30000
#进程pid存放路径
pidfile = /run/uwsgi.pid
#uwsgi日志存储路径
daemonize = /var/log/uwsgi.log
5、配置nginx代理uwsgi
[root@web01 ~]# uwsgi --ini /opt/demosite/uwsgi.ini
[uWSGI] getting INI configuration from /opt/demosite/uwsgi.ini
[root@web01 ~]# netstat -lntp
Active Internet connections (only servers)
Proto Recv-Q Send-Q Local Address Foreign Address State PID/Program name
tcp 0 0 127.0.0.1:9999 0.0.0.0:* LISTEN 3413/uwsgi
[root@web01 ~]# cat /etc/nginx/conf.d/py.zjh.net.conf
server {
	listen 80;
	server_name py.zjh.net;
	client_max_body_size 100M;


	location / {
		index index.html;
		uwsgi_pass 127.0.0.1:9999;
		uwsgi_param UWSGI_CHDIR /opt/demosite;
		uwsgi_param UWSGI_SCRIPT demosite.wsgi;
		include uwsgi_params;
	}
}
使用nginx uwsgi代理方式部署python的Django项目
1、下载Django博客系统
准备博客系统的代码
查看需要什么依赖
[root@web01 ~]# cat /code/pythonav/requirements.txt
安装所需要的依赖
[root@web01 ~]# pip3 install -i https://pypi.doubanio.com/simple/ -r /code/pythonav/requirements.txt
4、配置项目连接至远程数据库,并在数据库主机上创建对应名称的数据库
[root@web01 ~]# vim /code/pythonav/pythonav/settings.py
搜索mysql
DATABASES = {
    'default': {
        'ENGINE': 'django.db.backends.mysql',
        'NAME': 'pythonav',
        'USER': 'app',
        'PASSWORD': 'zjh123',
        'HOST': '172.16.1.51',
        'PORT': '3306',
    }
}
在数据库主机创建对应的数据库
[root@db01 ~]# mysql -uroot -pzjh123
Welcome to the MariaDB monitor.  Commands end with ; or \g.
Your MariaDB connection id is 2
Server version: 5.5.68-MariaDB MariaDB Server

Copyright (c) 2000, 2018, Oracle, MariaDB Corporation Ab and others.

Type 'help;' or '\h' for help. Type '\c' to clear the current input statement.

MariaDB [(none)]> create database pythonav;
Query OK, 1 row affected (0.04 sec)
5、导入博客的数据内容
初始化数据库
[root@web01 pythonav]# python3 manage.py makemigrations
[root@web01 pythonav]# python3 manage.py migrate
6、收集Django静态文件
收集静态文件至指定位置
[root@web01 pythonav]# python3 manage.py collectstatic
7、配置uwsgi运行项目
查看uwsgi配置是否符合需求,不符合则修改
[root@web01 ~]# vim /code/pythonav/pythonav_uwsgi.ini
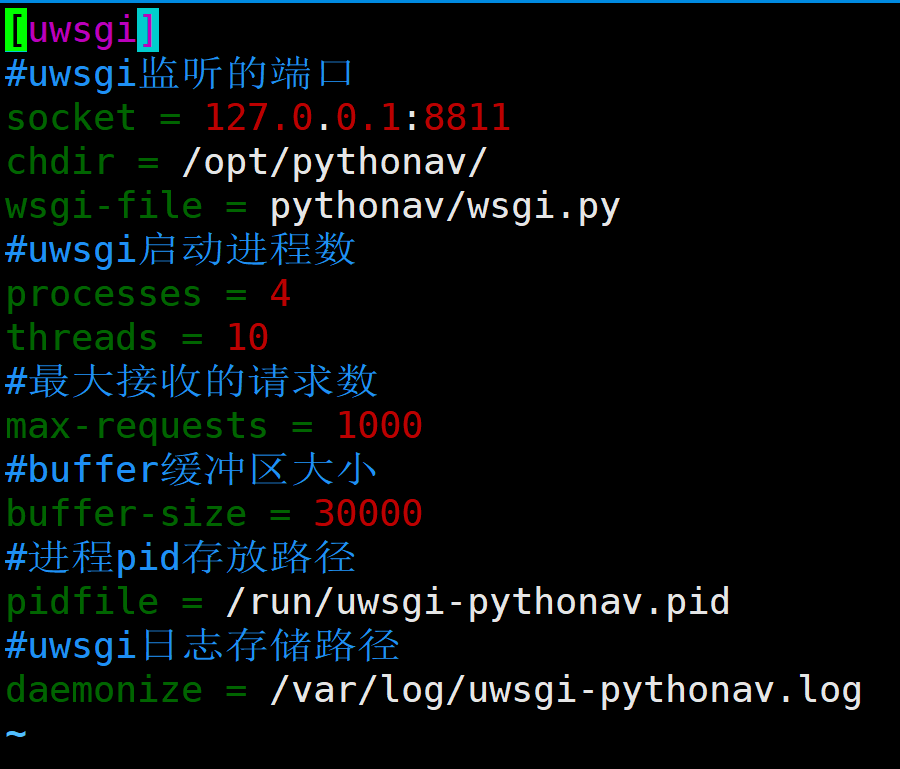
(此处chdir与wsgi-file可以在nginx定义,可删除)
[root@web01 ~]# cat /code/pythonav/pythonav_uwsgi.ini
[uwsgi]
#uwsgi监听的端口
socket = 127.0.0.1:8811

#uwsgi启动进程数
processes = 4
threads = 10
#最大接收的请求数
max-requests = 1000
#buffer缓冲区大小
buffer-size = 30000
#进程pid存放路径
pidfile = /run/uwsgi-pythonav.pid
#uwsgi日志存储路径
daemonize = /var/log/uwsgi-pythonav.log
启动项目
[root@web01 ~]# uwsgi --ini /code/pythonav/pythonav_uwsgi.ini
[uWSGI] getting INI configuration from /code/pythonav/pythonav_uwsgi.ini
[root@web01 ~]# netstat -lntp
Active Internet connections (only servers)
Proto Recv-Q Send-Q Local Address Foreign Address State PID/Program name
tcp 0 0 127.0.0.1:8811 0.0.0.0:* LISTEN 3663/uwsgi
8、配置nginx
[root@web01 ~]# cat /etc/nginx/conf.d/av.zjh.net.conf
server {
        listen 80;
        server_name av.zjh.net;
        client_max_body_size 100M;

        location / {
                index index.html;
                uwsgi_pass 127.0.0.1:8811;
                uwsgi_param UWSGI_CHDIR /code/pythonav;
                uwsgi_param UWSGI_SCRIPT pythonav.wsgi;
                include uwsgi_params;
        }

        location /static {
                alias /code/pythonav/static;
             #   root /code/pythonav;   (避免路径中的目录冲突,可采取两种写法,推荐alias)
        }
}
9、创建超级管理员用户
[root@web01 pythonav]# python3 manage.py createsuperuser
Username (leave blank to use 'root'): zjh
Email address: 123@qq.com
Password: zjh.net123
Password (again): zjh.net123
Superuser created successfully.
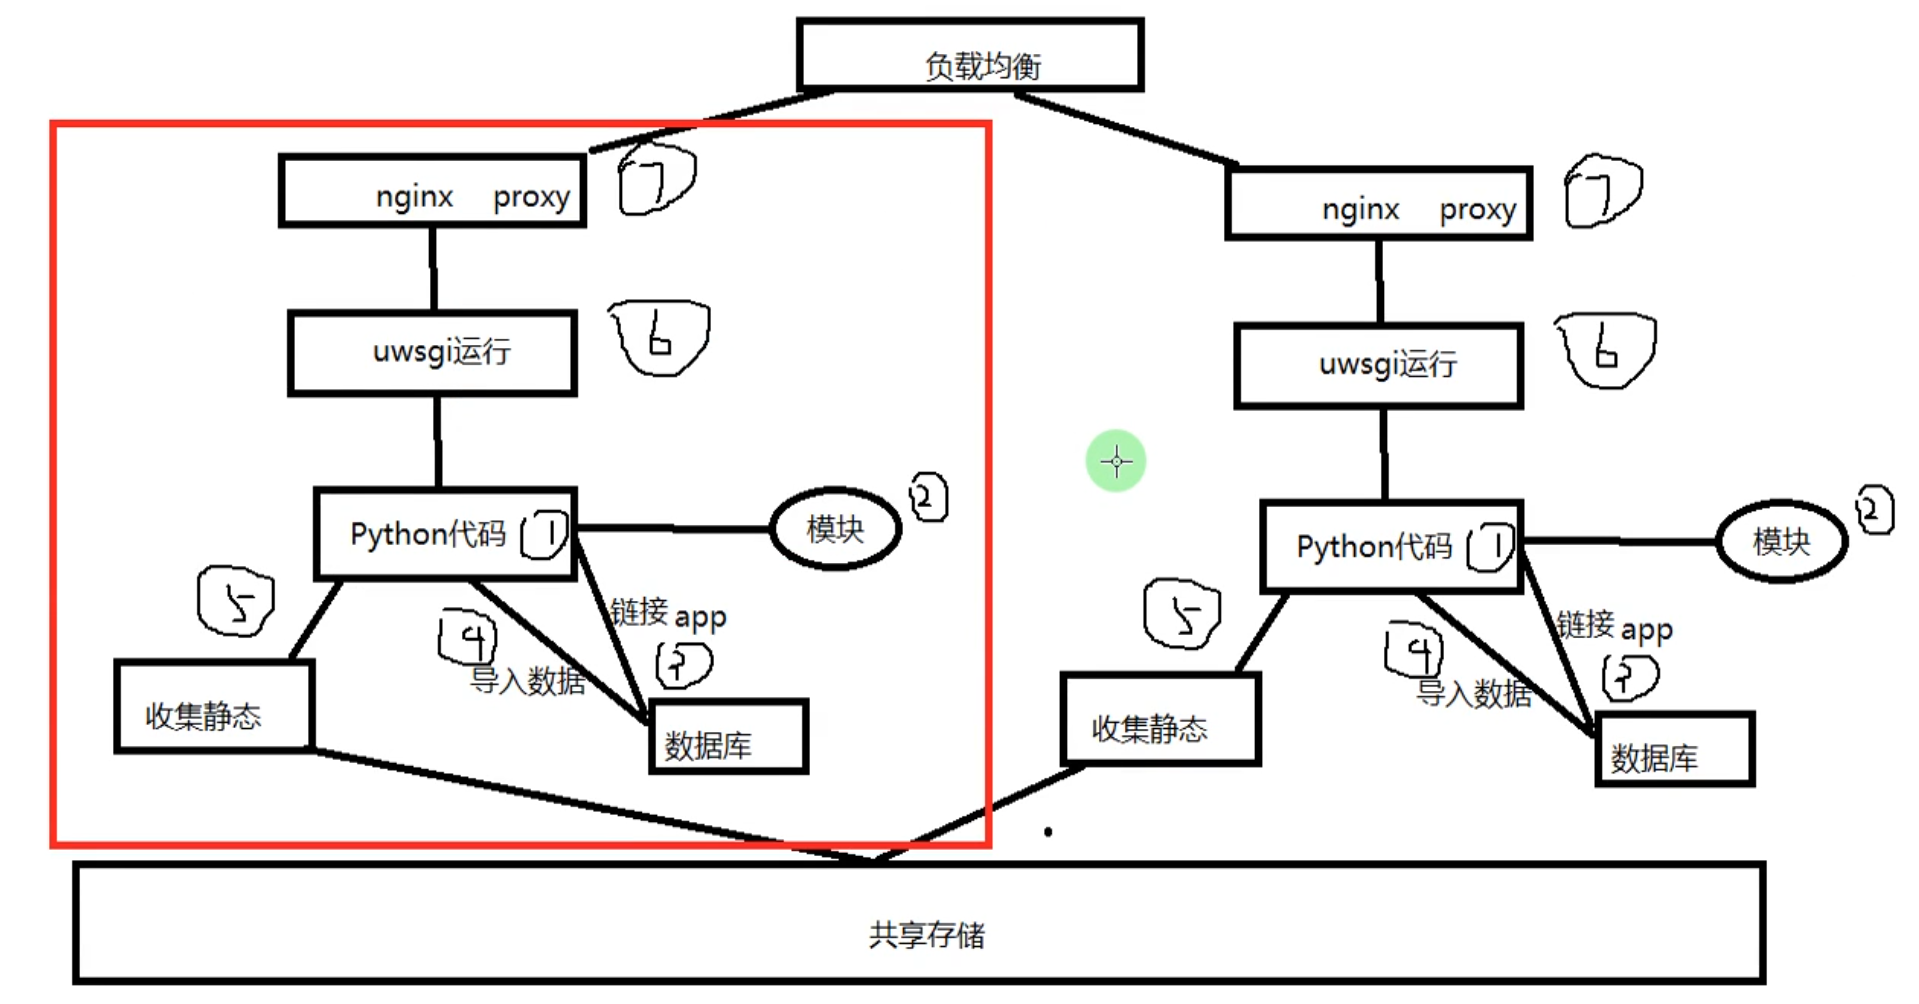
部署python项目流程图